2.4. pythonの実行方法
この演習では Windows コマンドプロンプトから python を実行する場合がありますので、その方法を示しておきます。以下では test.py という主プログラムから module1.py というモジュールを読み込んで使う場合を示します。
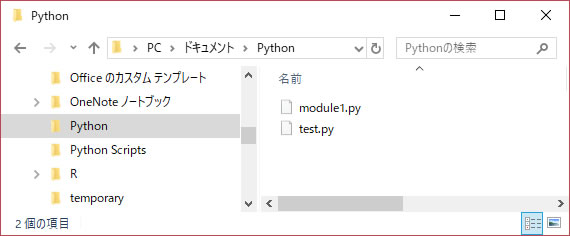
まず適当なフォルダを用意します。たとえばWindows のDocument フォルダの下に Python というフォルダを作ってください。そこに以下のようなファイル module1.py を作成してください。使用するテキストエディタは何でもかまいませんが、拡張子は .py とする必要があります。
module1.py
1 2 3 4 5 6 | class MyClass:
def __init__(self):
print ('MyClass was constructed.')
def method1(self, val):
print ('method1 was called.')
print (val)
|
同じフォルダに、test.py、も作成します。
test.py
1 2 3 4 5 6 7 | import module1
object1 = module1.MyClass()
object1.method1('first')
from module1 import MyClass
object2=MyClass()
object2.method1('second')
|
これでプログラムは準備完了です。次に Windows コマンドプロンプトから test.py を実行する手順を示します。
まず Windows で test.py があるフォルダをエクスプローラで開いてください。
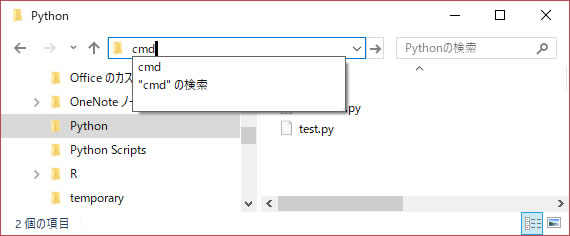
以下のようにアドレスバーにcmdと入力してEnterキーを押しましょう。
すると以下のように、そのフォルダがカレントパスになった状態でコマンドプロンプトが開きますね。ただしまだ4行目以下は表示されていないはずです。
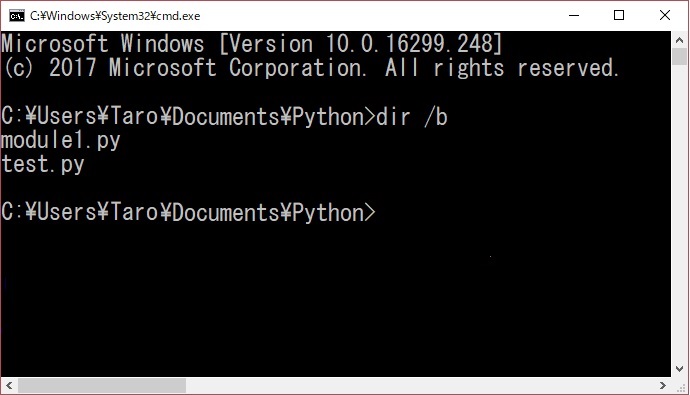
コマンドプロンプトが起動したら、上の画面のようにまず、
dir /b
でtest.pyとmodule1.pyが表示されることを確認してください。そして、
python test.py
と入力することでpythonが実行され、以下の結果が得られます。 test.pyの実行結果(windows コマンドプロンプトから実行した場合)
Microsoft Windows [Version 10.0.16299.248]
(c) 2017 Microsoft Corporation. All rights reserved.

C:\Users\Taro\Documents\Python>dir /b
module1.py
test.py

C:\Users\Taro\Documents\Python>python test.py

MyClass was constructed.
method1 was called.
first
MyClass was constructed.
method1 was called.
second